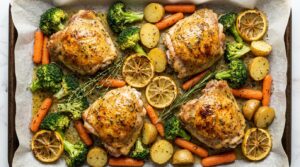
This One-Pan Honey Garlic Chicken Is Basically Cheating
Six ingredients, one skillet, and a sauce you’ll want to drink straight from the pan.
My husband asked me last week why our chicken dinners suddenly got so good.
I didn’t have the heart to tell him it’s because I stopped trying so hard.
This honey garlic chicken thigh recipe is the one I make on nights when I have zero energy left but still want something that tastes like I planned ahead. One pan. About 10 minutes of actual hands-on work. And a sticky, garlicky sauce so good it borders on unfair.
If you’ve been hunting for an easy chicken dinner that doesn’t taste like an easy chicken dinner, you just found it. 🍯
What You’ll Need
For the Chicken
- 6 bone-in, skin-on chicken thighs
- 1 tsp salt
- ½ tsp black pepper
- 1 tbsp olive oil
For the Honey Garlic Sauce
- ⅓ cup honey
- ¼ cup soy sauce
- 6 cloves garlic, minced
- 1 tbsp rice vinegar
- 1 tsp fresh ginger, grated
- ½ tsp red pepper flakes (optional, but I always add it)
To Finish
- Sliced green onions
- Sesame seeds
Tools You’ll Need
- Large oven-safe skillet (cast iron is perfect here)
- Tongs
- Small mixing bowl
- Whisk or fork
- Meat thermometer
Pro Tips
1Pat the chicken bone dry before it hits the pan. Any moisture on the skin steams instead of crisping, and crispy skin is the whole point here.
2Don’t touch the chicken once it’s skin-side down. I know the urge to poke it is strong. Resist. Let it sit untouched for the full sear time.
3Let the sauce reduce on its own. It looks thin at first and then suddenly turns glossy and clingy in the last two minutes. Trust the process.
4Use a thermometer, not a clock. Thighs are done at 165°F, but ovens lie. A $10 thermometer will save your dinner more than once.
5Double the sauce. Save half before it touches raw chicken and spoon it over rice later. This is the move.
Substitutions and Variations
- Chicken breasts work too. Cut the cook time down since they’re leaner and dry out faster.
- Maple syrup instead of honey gives it a deeper, almost smoky sweetness.
- Tamari instead of soy sauce makes this gluten-free with zero flavor loss.
- Toss in broccoli florets or sliced bell peppers around the chicken for the last 10 minutes so the whole dinner cooks in one pan.
- Swap red pepper flakes for a spoonful of sriracha if you want the heat to actually punch through the sweetness.
Make Ahead Tips
Whisk the sauce up to 3 days ahead and keep it in the fridge in a sealed jar.
Or go further and let the chicken marinate in it overnight. Just hold back a little extra sauce to brush on at the end, since the marinade touched raw chicken and shouldn’t be reused without boiling it first.
Instructions
- Preheat your oven to 400°F.
- Pat the chicken thighs completely dry, then season both sides with salt and pepper.
- Heat olive oil in an oven-safe skillet over medium-high heat.
- Place the thighs skin-side down and sear for 6 to 7 minutes without moving them, until deeply golden.
- Flip the thighs and sear the other side for 3 minutes.
- While that’s happening, whisk together the honey, soy sauce, garlic, rice vinegar, ginger, and red pepper flakes in a small bowl.
- Pour the sauce over the chicken, spooning some over the top of each piece.
- Transfer the skillet to the oven and roast for 18 to 20 minutes, until the chicken hits 165°F.
- Move the skillet back to the stovetop and simmer the sauce over medium heat for 2 to 3 minutes, until glossy and thick enough to coat a spoon.
- Top with green onions and sesame seeds, then serve immediately over rice.
Nutrition, Swaps, and Pairings
Here’s roughly what you’re working with per thigh, sauce included:
| Nutrient | Approx. per serving |
|---|---|
| Calories | 340 |
| Protein | 27g |
| Carbs | 18g |
| Fat | 19g |
Lower carb: cut the honey to 3 tablespoons and serve over cauliflower rice.
Pairs well with: steamed jasmine rice, garlicky bok choy, or a simple cucumber salad to cut through the sweetness.
Time-saving tip: double the whole batch. The extra thighs reheat beautifully for lunch, and the extra sauce is basically currency in my house.
Leftovers and Storage
Store leftovers in an airtight container in the fridge for up to 4 days.
Freezes well too, up to 3 months. Thaw overnight in the fridge before reheating.
Reheat gently in a skillet over low heat with a splash of water so the sauce loosens back up instead of turning sticky and hard.
FAQ
Can I use boneless thighs?
Yes, just cut the oven time down to about 12 minutes since they cook faster without the bone.
My sauce burned in the oven. What happened?
Honey based sauces scorch fast at high heat, especially near the edges of the pan. Stick to 400°F and keep an eye on it after the 15-minute mark.
Do I have to sear the chicken first?
You could skip it, but the skin won’t crisp up and you’ll miss out on a lot of flavor. The sear is doing more work than it looks like.
Can I make this on the stovetop only, no oven?
Yes. After searing, lower the heat, cover, and cook another 12 to 15 minutes, flipping once, until the chicken reaches 165°F.
Wrapping Up
This is the kind of dinner that makes people think you had a plan all along, when really you just had chicken thighs and a jar of honey.
Make it once and it earns a permanent spot in the weekly rotation. Mine’s been there for months now.
Try it out and come back to leave a comment telling me how it went. And if you tweak the sauce or add your own twist, I genuinely want to hear about it.